You may wish to have others collaborate on your WordPress site. You can grant access to the site by creating a user profile for each collaborator. The steps are as follows:
- Sign into CreateFSU and navigate to your site’s WordPress dashboard. (For more in-depth instructions on this, visit Logging into Your CreateFSU Account.)
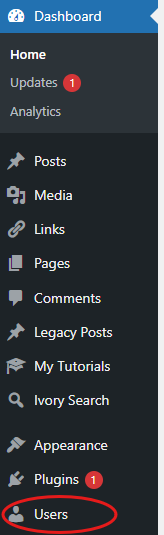
- Click “Users” in the lefthand menu.
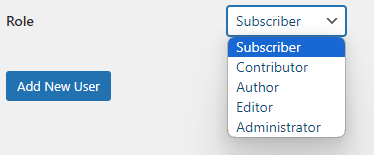
3. Click “Add New User.”

4. Fill out their profile information:
- For username and email, we recommend using their FSU ID and email.
- You can leave the password as-is.
- Make sure the box next to “Send User Notification” is checked. This will send the new user an email allowing them to reset their password and giving them a link to access the site. (Note: They will not log in through Create FSU—only through WordPress.)

5. Select the appropriate Role from the dropdown menu. WordPress user roles include:
- Subscriber: Receives notifications when you update the site.
- Contributor: Has no publishing or uploading capability but can write and edit their own posts until they are published.
- Author: Can write, upload media, edit, and publish their own posts.
- Editor: Has access to all posts, pages, comments, categories, and tags, and can upload media.
- Administrator: The highest level of permission. Admins have the power to access almost everything, including site templates and overall design. To protect your content, use caution when giving this level of access.
6. Click “Add New User.” Let each collaborator know to expect an email from WordPress about their profile, and instruct them to update their password before accessing the site.